| 일 | 월 | 화 | 수 | 목 | 금 | 토 |
|---|---|---|---|---|---|---|
| 1 | 2 | 3 | ||||
| 4 | 5 | 6 | 7 | 8 | 9 | 10 |
| 11 | 12 | 13 | 14 | 15 | 16 | 17 |
| 18 | 19 | 20 | 21 | 22 | 23 | 24 |
| 25 | 26 | 27 | 28 | 29 | 30 | 31 |
- Image Classification
- 브루트포스알고리즘
- C
- C++
- 논문리뷰
- 문자열
- 소수판정
- 정수론
- 자료구조
- 해시를사용한집합과맵
- 큐
- 사칙연산
- 프로그래머스sql
- C언어
- 이분탐색
- 백준
- 프로그래머스코딩테스트
- 다이나믹프로그래밍
- SQL
- 프로그래머스
- 이진탐색
- 정렬
- 그리디알고리즘
- 논문구현
- 수학
- 백준알고리즘
- MySQL
- 구현
- 그리디
- 프로그래머스연습문제
- Today
- Total
초보 개발자의 이야기, 릿허브
[논문구현] DenseNet (Densely Connected Convolutional Networks) 구현 본문
DenseNet 에 대한 논문 리뷰
https://beginnerdeveloper-lit.tistory.com/161
[논문리뷰] DenseNet (Densely Connected Convolutional Networks)
DenseNet https://arxiv.org/abs/1608.06993 Densely Connected Convolutional Networks Recent work has shown that convolutional networks can be substantially deeper, more accurate, and efficient to train if they contain shorter connections between layers close
beginnerdeveloper-lit.tistory.com
DenseNet
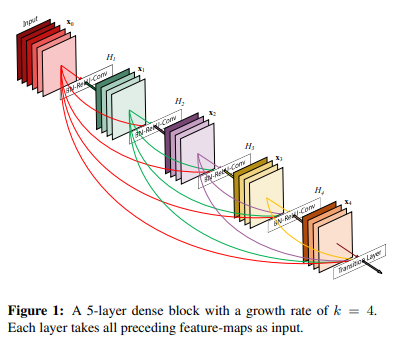
지난번 리뷰한 "Densely Connected Convolutional Networks" 논문의
DenseNet을 구현해보고자 한다.
DenseNet이란, 모든 Layer들을 densely하게 연결하는 dense connectivity pattern을 사용한 네트워크로,
다른 구조들에 비해 적은 파라미터 수를 가지고도 뛰어난 결과와 낮은 연산량을 가진 것이 특징이다.
DenseNet의 자세한 구조는 아래 Table을 참고하자.
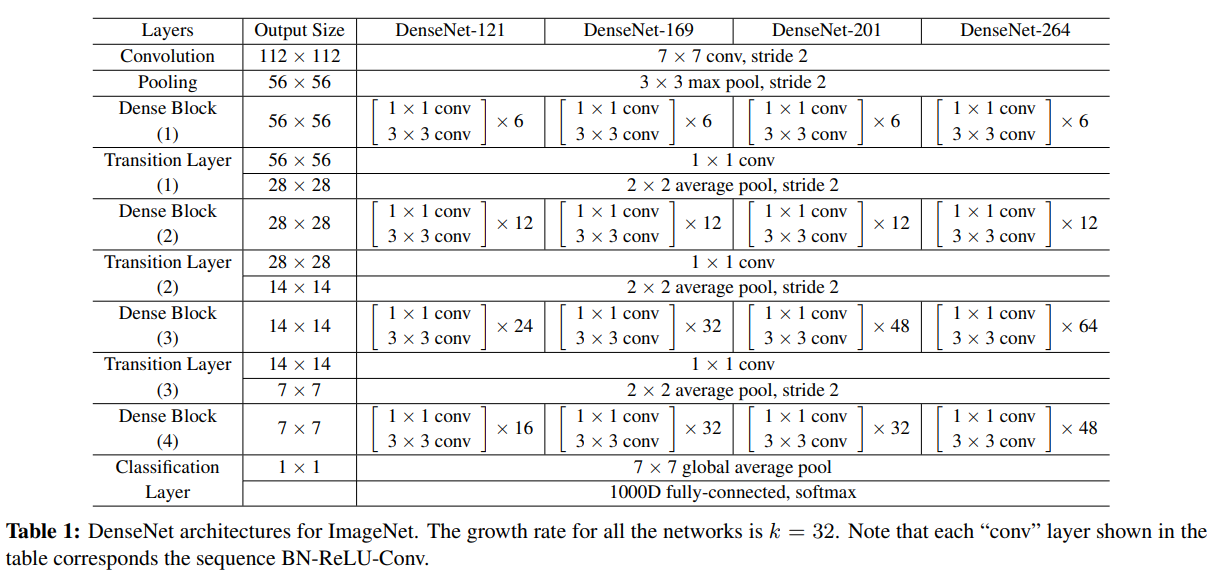
이 중에서 필자는 비교적 간단한 DenseNet 121-Layer를 구현했다.
다른 모델에 비해 필터의 개수가 적은 것이 특징이다.

모든 DenseNet 모델들은 위와 같은 구조를 갖는다.
down-sampling을 용이하게 하기 위해, 네트워크를 다음과 같이 3개의 Dense Block으로 나누었다.
DenseNet은 이렇듯 3개의 Dense Block과 각 Dense Block 사이의 Transition Layer로 구성되며,
각 Transition Layer는 Convolution과 Pooling을 수행한다.
DenseNet은 앞서 언급했듯, 단순히 모든 Layer를 연결하는 방식이다.
ResNet과의 연결 방식의 차이점은 summation이 아닌 concatenation을 사용한다는 점이다.
이는 하단의 코드에서 자세히 살펴보도록 하자.
Environment & Parameter
❗ 해당 논문의 DenseNet-121 모델의 구조에 초점을 맞춰 구현하였으며,
그 외 세부적인 사항까지 완벽하게 구현하지는 못했습니다.
❗ 또한, 논문에 사용된 Dataset과 다른 Dataset을 사용했으므로,
Parameter들 또한 상이하다는 점 양해 부탁드립니다.
실험에 사용한 환경은 아래와 같습니다.
Language : Python
Framework : Tensorflow (GPU)
Dataset : Kaggle Dog & Cat 중 일부 사용 (train : Dog 5000, Cat 5000 / validation : Dog 2000, Cat 2000)
(https://www.kaggle.com/datasets/tongpython/cat-and-dog?select=training_set)
(Dataset 중 일부 훼손된 이미지가 있어, 해당 이미지들 필수 삭제 후 훈련 필요)
Image Size : 224 x 224 x 3
Batch Size : 32
Epoch : 50
Learning Rate : 0.001
DenseNet Code
<DenseNet Layers Code>
코드를 보면서 DenseNet Model의 각 Layer들을 하나씩 살펴보도록 하자.
먼저 다시 DenseNet-121의 구조를 보면 아래 Table과 같다.

본격적인 구현에 앞서, 중요한 Parameter들을 하나씩 설정하고 넘어가자.
바로, Growth Rate와 Compression이다.
Growth Rate란, 각 Layer에서 몇 개의 feature map을 뽑을지 결정하는 Parameter이며,
각 Layer가 전체 output에 어느정도 기여할지를 결정하는 Parameter이기도 하다.
모델의 compactness를 향상시키기 위해, transition Layer의 feature map의 개수를 줄일 수 있다.
만약 dense block이 m개의 feature map을 가지고 있다면,
그 뒤의 transition Layer는 θm개의 output feature map을 반환할 것이다.
여기서, θ가 바로 compression factor이다. (단, 0 < θ <= 1)
본 논문의 실험에서는 θ = 0.5 로 설정했기에, 필자도 동일하게 설정했다.
def DenseNet(x):
    # input = 224 x 224 x 3
    k = 32  # Grow Rate
    compression = 0.5   # compression factor
[ Convolution ]
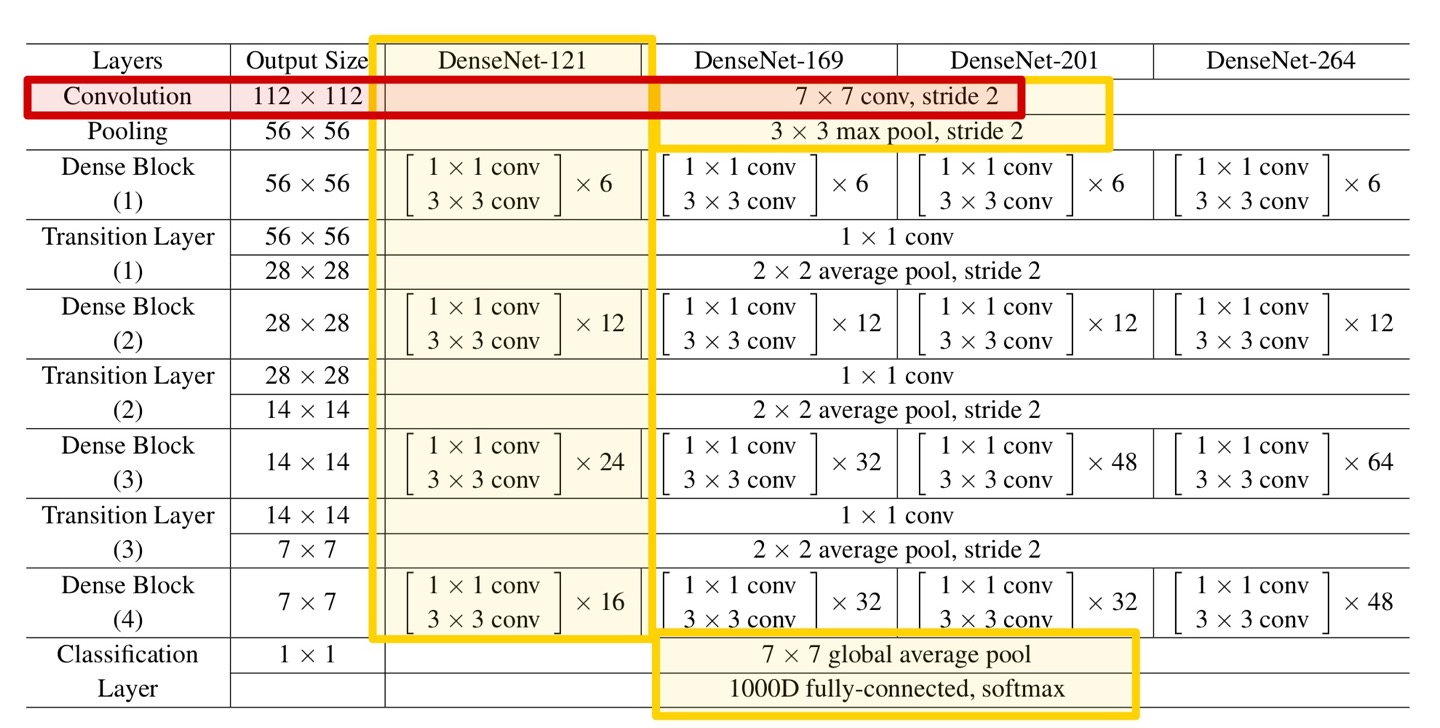
첫 번째 Layer는 Convolution Layer로, 위 Table과 같이 kernel size = 7 x 7 (stride = 2) 연산을 수행한다.
output size = 112 x 112 이다.
# 1. Convolution
x = layers.Conv2D(k * 2, (7, 7), strides=2, padding='same', input_shape=(224, 224, 3))(x)    # 112x112x64
x = layers.BatchNormalization()(x)
x = layers.Activation('relu')(x)
[ Pooling ]
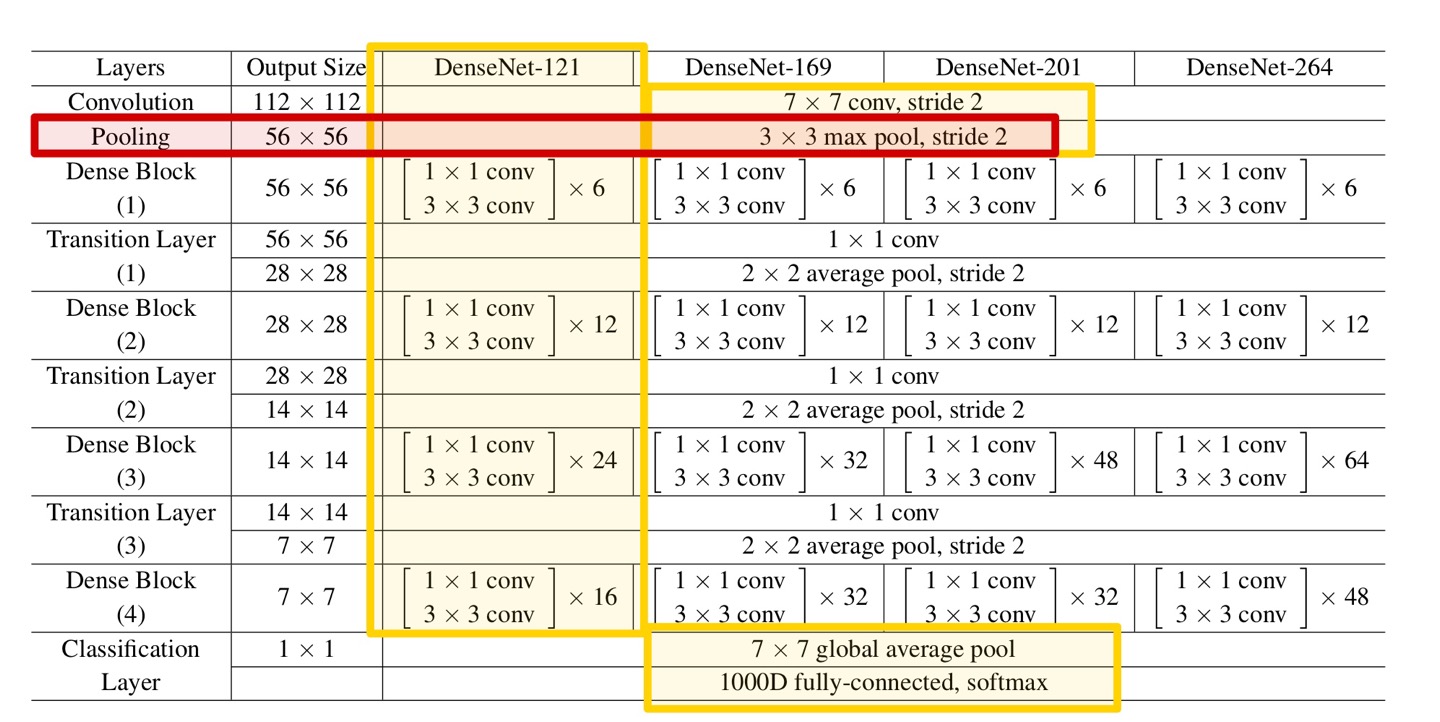
다음은 Pooling Layer로, 위 Table과 같이 kernel size = 3 x 3 (stride = 2) max pooling 연산을 수행한다.
output size = 56 x 56이다.
# 2. Pooling
x = layers.MaxPool2D((3, 3), 2, padding='same')(x)  # 56x56x64
[ Dense Block (1) ]
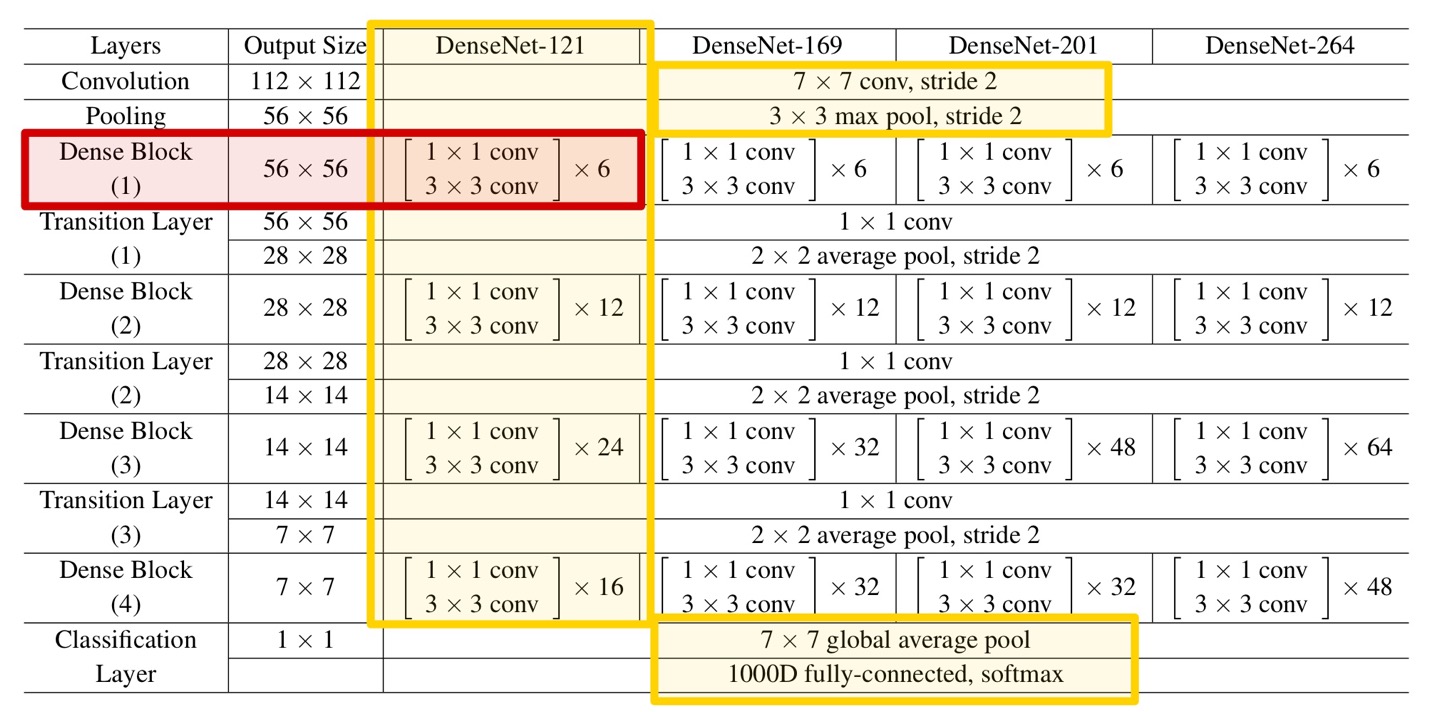
다음은 Dense Block이다. model마다 Dense Block의 구조는 약간씩 다르다.
DenseNet-121에서는 1 x 1 Convolution과 3 x 3 Convolution을 각각 6, 12, 24, 16회 반복한다.
첫 번째 Dense Block은 위와 같은 연산을 6번 반복하면 된다.
단, 여기서 한 가지 중요한 점이 있다.
바로, Densely Connectivity 이다.
DenseNet이란 모든 Layer들을 연결한다는 개념에서 시작한 Network이다.
이전 모든 feature map들에 대해 접근 및 ResNet과는 달리 이를 concat하여 구현함에 주의해야한다.
DenseNet의 중심이자 주요 알고리즘인 이 connectivity를 필자는 다음과 같이 구현했다.
# 3. Dense Block (1)
for i in range(6) :
    x_l = layers.Conv2D(k * 4, (1, 1), strides=1, padding='same')(x)    # 56x56x128
    x_l = layers.BatchNormalization()(x_l)
    x_l = layers.Activation('relu')(x_l)

    x_l = layers.Conv2D(k, (3, 3), strides=1, padding='same')(x_l)  # 56x56x32
    x_l = layers.BatchNormalization()(x_l)
    x_l = layers.Activation('relu')(x_l)

    x = layers.Concatenate()([x, x_l])  # 96 -> 128 -> 160 -> 192 -> 224 -> 256

n번째 Layer는 이전의 모든 Layer들의 feature map(X0, ... ,Xn-1)을 input으로 받게 된다.
이를 수식으로 나타내면 위와 같다.
위 식에 따라 구현된 코드를 살펴보면,
이전 Layer의 output인 x를 현재 Dense Block 내의 연산을 거친 feature map x_l과 concat한다.
(여기서, 저번 ResNet의 경우 Concatenate이 아닌, Add 를 사용했다.)
이렇게 연결된 x는 다시 해당 Dense Block의 input으로 들어가게 되고,
이러한 과정을 Table에 적힌 횟수만큼 반복하면 된다.
이 과정을 반복하게 되면, 결국 모든 feature map들은 위 식과 같이 이어지게 되고,
이것이 해당 Layer, Dense Block의 결과가 된다.
[ Transition Layer (1) ]
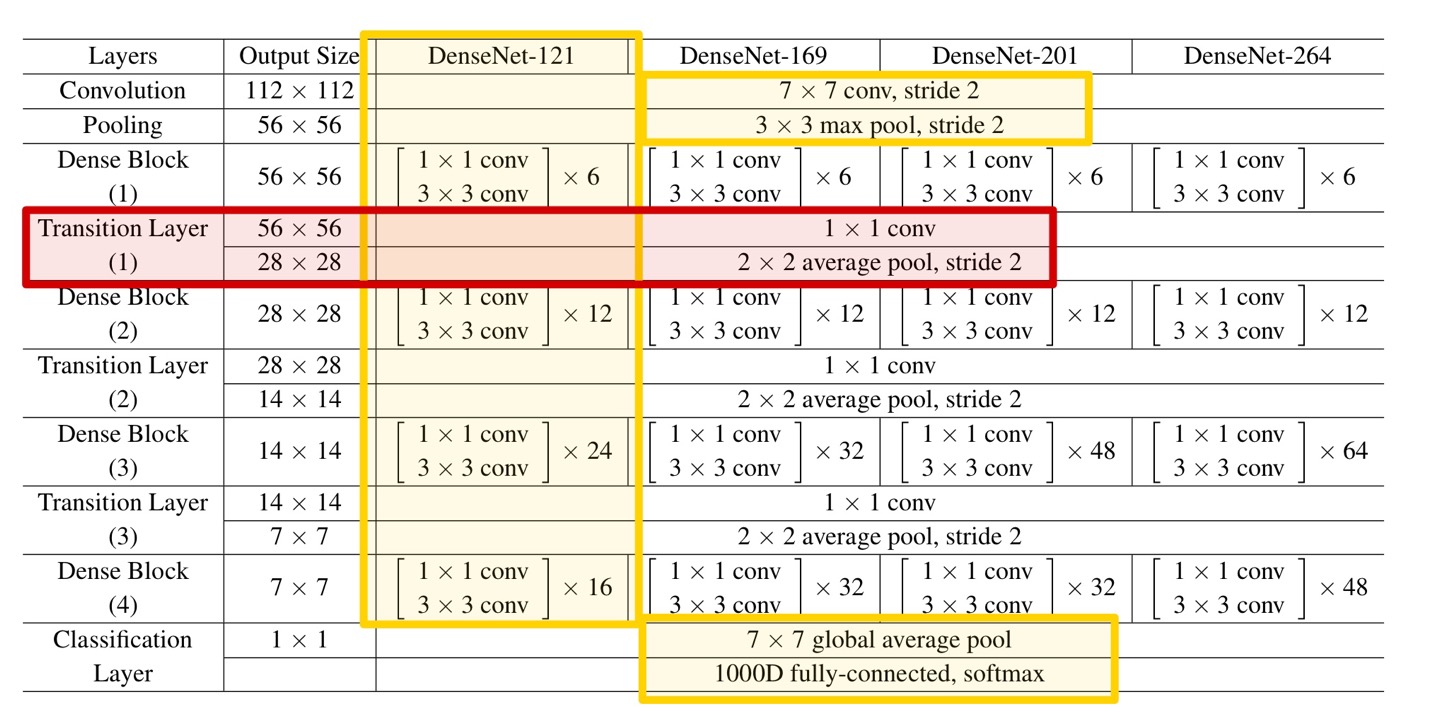
다음은 Transition Layer 이다.
Transition Layer는 Convolution과 Pooling 연산을 하는 Layer로,
Table과 같은 연산을 적용해주기만 하면 된다.
단, Convolution 과정에서 위에서 언급한 compression, 압축률이 사용되며
이를 통해 filter의 개수가 조절된다.
    # 4. Transition Layer (1)
    current_shape = int(x.shape[-1]) # 56x56x256
    x = layers.Conv2D(int(current_shape * compression), (1, 1), strides=1, padding='same')(x)
    x = layers.BatchNormalization()(x)
    x = layers.Activation('relu')(x)
    x = layers.AveragePooling2D((2, 2), strides=2, padding='same')(x)   # 28x28
이후 나머지 Dense Block과 Transition Layer의 구조는 모두 동일하므로,
설명을 생략하도록 하겠다.
[ Classification Layer ]
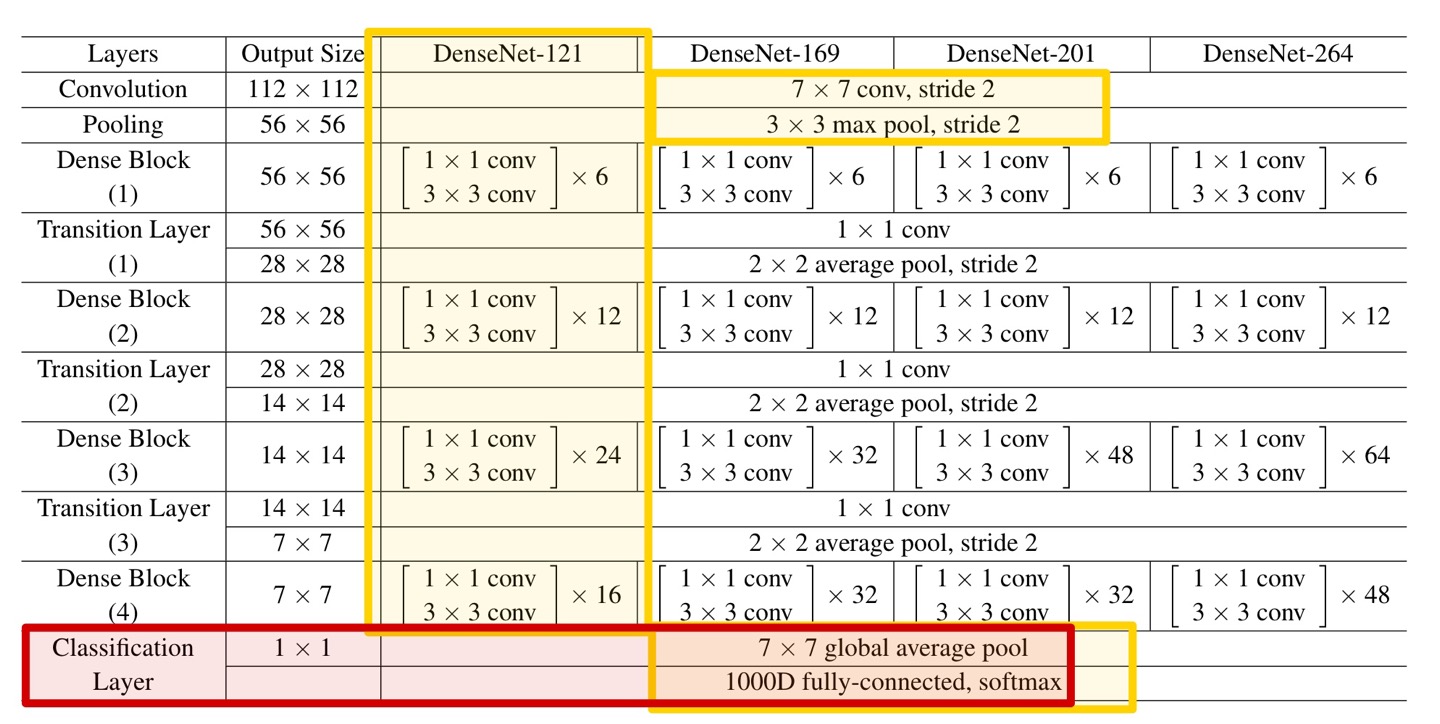
네트워크 가장 끝단의 Classification Layer에 대해 살펴보자.
이 Layer에서는 Table과 같이 global average pooling 및 1000D fc-connected, softmax 연산이 이루어진다.
단, 필자는 2개의 class로 분류되는 dataset을 이용했으며, dataset에 따라 변경이 필요하다.
# 10. Classification Layer
x = layers.GlobalAveragePooling2D()(x)
# classes = 2 (softmax)
x = layers.Dense(2, activation='softmax')(x)
<DenseNet Model Code>
'''
< DenseNet Architecture>
- Dense Connectivity pattern
- Dense-121, Dense-169, Dense-201, Dense-264
- Implement Dense-121 (6, 12, 24, 16)
'''

def DenseNet(x):
    # input = 224 x 224 x 3
    k = 32  # Grow Rate
    compression = 0.5   # compression factor

    # 1. Convolution
    x = layers.Conv2D(k * 2, (7, 7), strides=2, padding='same', input_shape=(224, 224, 3))(x)    # 112x112x64
    x = layers.BatchNormalization()(x)
    x = layers.Activation('relu')(x)

    # 2. Pooling
    x = layers.MaxPool2D((3, 3), 2, padding='same')(x)  # 56x56x64

    # 3. Dense Block (1)
    for i in range(6) :
        x_l = layers.Conv2D(k * 4, (1, 1), strides=1, padding='same')(x)    # 56x56x128
        x_l = layers.BatchNormalization()(x_l)
        x_l = layers.Activation('relu')(x_l)

        x_l = layers.Conv2D(k, (3, 3), strides=1, padding='same')(x_l)  # 56x56x32
        x_l = layers.BatchNormalization()(x_l)
        x_l = layers.Activation('relu')(x_l)

        x = layers.Concatenate()([x, x_l])  # 96 -> 128 -> 160 -> 192 -> 224 -> 256

    # 4. Transition Layer (1)
    current_shape = int(x.shape[-1]) # 56x56x256
    x = layers.Conv2D(int(current_shape * compression), (1, 1), strides=1, padding='same')(x)
    x = layers.BatchNormalization()(x)
    x = layers.Activation('relu')(x)
    x = layers.AveragePooling2D((2, 2), strides=2, padding='same')(x)   # 28x28

    # 5. Dense Block (2)
    for i in range(12) :
        x_l = layers.Conv2D(k * 4, (1, 1), strides=1, padding='same')(x)
        x_l = layers.BatchNormalization()(x_l)
        x_l = layers.Activation('relu')(x_l)

        x_l = layers.Conv2D(k, (3, 3), strides=1, padding='same')(x_l)
        x_l = layers.BatchNormalization()(x_l)
        x_l = layers.Activation('relu')(x_l)

        x = layers.Concatenate()([x, x_l])

    # 6. Transition Layer (2)
    current_shape = int(x.shape[-1])
    x = layers.Conv2D(int(current_shape * compression), (1, 1), strides=1, padding='same')(x)
    x = layers.BatchNormalization()(x)
    x = layers.Activation('relu')(x)
    x = layers.AveragePooling2D((2, 2), strides=2, padding='same')(x)   # 14x14

    # 7. Dense Block (3)
    for i in range(24) :
        x_l = layers.Conv2D(k * 4, (1, 1), strides=1, padding='same')(x)
        x_l = layers.BatchNormalization()(x_l)
        x_l = layers.Activation('relu')(x_l)

        x_l = layers.Conv2D(k, (3, 3), strides=1, padding='same')(x_l)
        x_l = layers.BatchNormalization()(x_l)
        x_l = layers.Activation('relu')(x_l)

        x = layers.Concatenate()([x, x_l])

    # 8. Transition Layer (3)
    current_shape = int(x.shape[-1])
    x = layers.Conv2D(int(current_shape * compression), (1, 1), strides=1, padding='same')(x)
    x = layers.BatchNormalization()(x)
    x = layers.Activation('relu')(x)
    x = layers.AveragePooling2D((2, 2), strides=2, padding='same')(x)   # 7x7

    # 9. Dense Block (4)
    for i in range(16) :
        x_l = layers.Conv2D(k * 4, (1, 1), strides=1, padding='same')(x)
        x_l = layers.BatchNormalization()(x_l)
        x_l = layers.Activation('relu')(x_l)

        x_l = layers.Conv2D(k, (3, 3), strides=1, padding='same')(x_l)
        x_l = layers.BatchNormalization()(x_l)
        x_l = layers.Activation('relu')(x_l)

        x = layers.Concatenate()([x, x_l])

    # 10. Classification Layer
    x = layers.GlobalAveragePooling2D()(x)
    # classes = 2 (softmax)
    x = layers.Dense(2, activation='softmax')(x)

    return x
<Entire Code>
import tensorflow as tf
from tensorflow.keras import layers
from tensorflow.keras.preprocessing.image import ImageDataGenerator
import os
import numpy as np
import cv2
import matplotlib.pyplot as plt
from tensorflow.python.client import device_lib

print(device_lib.list_local_devices())
os.environ["CUDA_VISIBLE_DEVICES"] = "0"

tf.test.is_gpu_available()
gpus = tf.config.experimental.list_physical_devices('GPU')
if gpus:
    try:
        # Currently, memory growth needs to be the same across GPUs
        for gpu in gpus:
            tf.config.experimental.set_memory_growth(gpus[0], True)
    except RuntimeError as e:
        # Memory growth must be set before GPUs have been initialized
        print(e)

'''
< DenseNet Architecture>
- Dense Connectivity pattern
- Dense-121, Dense-169, Dense-201, Dense-264
- Implement Dense-121 (6, 12, 24, 16)
'''

def DenseNet(x):
    # input = 224 x 224 x 3
    k = 32  # Grow Rate
    compression = 0.5   # compression factor

    # 1. Convolution
    x = layers.Conv2D(k * 2, (7, 7), strides=2, padding='same', input_shape=(224, 224, 3))(x)    # 112x112x64
    x = layers.BatchNormalization()(x)
    x = layers.Activation('relu')(x)

    # 2. Pooling
    x = layers.MaxPool2D((3, 3), 2, padding='same')(x)  # 56x56x64

    # 3. Dense Block (1)
    for i in range(6) :
        x_l = layers.Conv2D(k * 4, (1, 1), strides=1, padding='same')(x)    # 56x56x128
        x_l = layers.BatchNormalization()(x_l)
        x_l = layers.Activation('relu')(x_l)

        x_l = layers.Conv2D(k, (3, 3), strides=1, padding='same')(x_l)  # 56x56x32
        x_l = layers.BatchNormalization()(x_l)
        x_l = layers.Activation('relu')(x_l)

        x = layers.Concatenate()([x, x_l])  # 96 -> 128 -> 160 -> 192 -> 224 -> 256

    # 4. Transition Layer (1)
    current_shape = int(x.shape[-1]) # 56x56x256
    x = layers.Conv2D(int(current_shape * compression), (1, 1), strides=1, padding='same')(x)
    x = layers.BatchNormalization()(x)
    x = layers.Activation('relu')(x)
    x = layers.AveragePooling2D((2, 2), strides=2, padding='same')(x)   # 28x28

    # 5. Dense Block (2)
    for i in range(12) :
        x_l = layers.Conv2D(k * 4, (1, 1), strides=1, padding='same')(x)
        x_l = layers.BatchNormalization()(x_l)
        x_l = layers.Activation('relu')(x_l)

        x_l = layers.Conv2D(k, (3, 3), strides=1, padding='same')(x_l)
        x_l = layers.BatchNormalization()(x_l)
        x_l = layers.Activation('relu')(x_l)

        x = layers.Concatenate()([x, x_l])

    # 6. Transition Layer (2)
    current_shape = int(x.shape[-1])
    x = layers.Conv2D(int(current_shape * compression), (1, 1), strides=1, padding='same')(x)
    x = layers.BatchNormalization()(x)
    x = layers.Activation('relu')(x)
    x = layers.AveragePooling2D((2, 2), strides=2, padding='same')(x)   # 14x14

    # 7. Dense Block (3)
    for i in range(24) :
        x_l = layers.Conv2D(k * 4, (1, 1), strides=1, padding='same')(x)
        x_l = layers.BatchNormalization()(x_l)
        x_l = layers.Activation('relu')(x_l)

        x_l = layers.Conv2D(k, (3, 3), strides=1, padding='same')(x_l)
        x_l = layers.BatchNormalization()(x_l)
        x_l = layers.Activation('relu')(x_l)

        x = layers.Concatenate()([x, x_l])

    # 8. Transition Layer (3)
    current_shape = int(x.shape[-1])
    x = layers.Conv2D(int(current_shape * compression), (1, 1), strides=1, padding='same')(x)
    x = layers.BatchNormalization()(x)
    x = layers.Activation('relu')(x)
    x = layers.AveragePooling2D((2, 2), strides=2, padding='same')(x)   # 7x7

    # 9. Dense Block (4)
    for i in range(16) :
        x_l = layers.Conv2D(k * 4, (1, 1), strides=1, padding='same')(x)
        x_l = layers.BatchNormalization()(x_l)
        x_l = layers.Activation('relu')(x_l)

        x_l = layers.Conv2D(k, (3, 3), strides=1, padding='same')(x_l)
        x_l = layers.BatchNormalization()(x_l)
        x_l = layers.Activation('relu')(x_l)

        x = layers.Concatenate()([x, x_l])

    # 10. Classification Layer
    x = layers.GlobalAveragePooling2D()(x)
    # classes = 2 (softmax)
    x = layers.Dense(2, activation='softmax')(x)

    return x


# Parameter
batch_size = 32
epoch = 50
learning_rate = 0.001

# Dataset (Kaggle Cat and Dog Dataset)
dataset_path = os.path.join('/home/kellybjs/Cat_Dog_Dataset')
train_dataset_path = dataset_path + '/train_set'
train_data_generator = ImageDataGenerator(rescale=1. / 255)
train_dataset = train_data_generator.flow_from_directory(train_dataset_path,
                                                         shuffle=True,
                                                         target_size=(224, 224),
                                                         batch_size=batch_size,
                                                         class_mode='categorical')

valid_dataset_path = dataset_path + '/validation_set'
valid_data_generator = ImageDataGenerator(rescale=1. / 255)
valid_dataset = valid_data_generator.flow_from_directory(valid_dataset_path,
                                                         shuffle=True,
                                                         target_size=(224, 224),
                                                         batch_size=batch_size,
                                                         class_mode='categorical')


# Train
input_shape = layers.Input(shape=(224, 224, 3), dtype='float32', name='input')
model = tf.keras.Model(input_shape, DenseNet(input_shape))
model.compile(optimizer=tf.keras.optimizers.SGD(learning_rate=learning_rate),
                  loss='categorical_crossentropy',
                  metrics=['acc'])
model.summary()
train = model.fit_generator(train_dataset, epochs=epoch, validation_data=valid_dataset)

# Accuracy graph
plt.figure(1)
plt.plot(train.history['acc'])
plt.plot(train.history['val_acc'])
plt.title('Accuracy')
plt.ylabel('accuracy')
plt.xlabel('epoch')
plt.legend(['train', 'validation'], loc='upper left')
plt.savefig('DenseNet_Accuracy_1.png')

# Loss graph
plt.figure(2)
plt.plot(train.history['loss'])
plt.plot(train.history['val_loss'])
plt.title('Loss')
plt.ylabel('loss')
plt.xlabel('epoch')
plt.legend(['train', 'validation'], loc='upper left')
plt.savefig('DenseNet_Loss_1.png')
Result
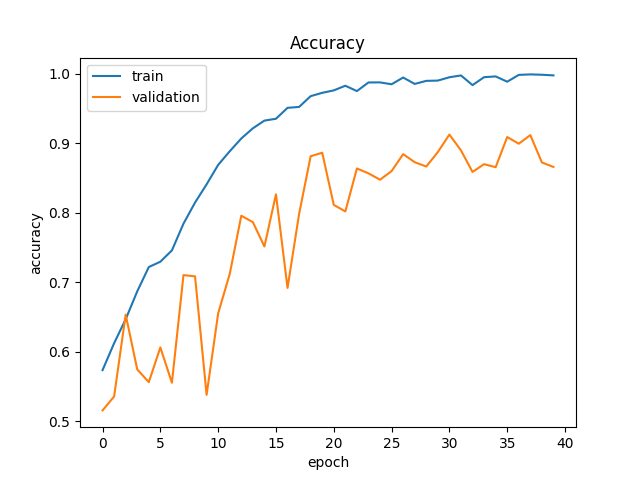
위 코드를 적용한 Train 및 Validation Accuracy 결과이다.
Train 시에는 최대 약 90~100 %, Validation 시에는 약 80~90%의 정확도가 나오는 것을 볼 수 있다.
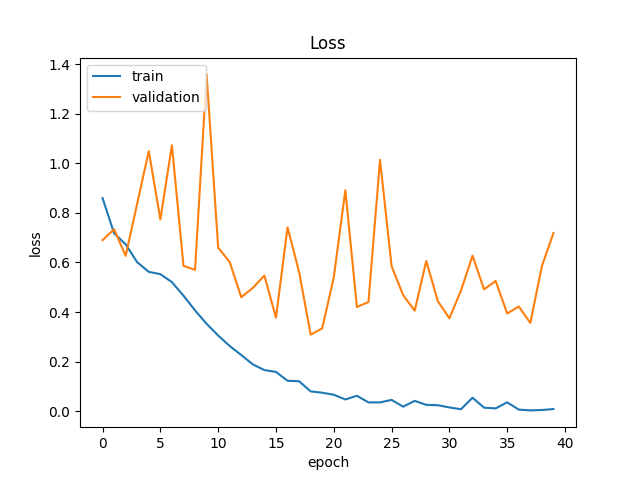
위 코드를 적용한 Train 및 Validation Loss 결과이다.
두 그래프 모두 점차 Loss 가 줄어드는 것이 보이나, Validation의 경우 후반에 많이 진동하는 점이 아쉽다.


